People who work with PowerPivot a lot know the importance of dates to analytics. If our data does not have a calendar or a date column, it will be very hard to get to calendar intelligence or derive time-based insights. Now, there are various ways to go about doing this. But the best one is yet to be revealed. And Excel expert Ken Puls is here to help us out.
So, what are we waiting for?
1 – The Setup
The first step is to write out the start and end dates of the calendar.
The best thing about this is that we can specify the “end” date by using the function “=TODAY()”. Yes, that’s the right guess! This will make our calendar up-to-date whenever we might want to use it.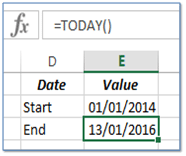
2 – Power Query
It’s time to take this table to Power Query.
For Excel 2013, select the cells and then go to Power Query tab, and select “From Table” from the ‘Excel Data’ section. For Excel 2016, the same option would be there in the Data tab, within the ‘Get & Transform’ section. Now press ‘OK’.
3 – The Calendar
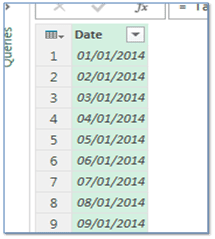
The first step is to click on ‘ ’. This will allow us to input a transformation rule on the imported table. Now we enter the following formula in it:
= {Number.From(Source[Value]{0}) .. Number.From(Source[Value]{1})}
The result is shown in the image below.
This will produce a column named “List”, which will have the dates from the start and end dates we specified. Remember that Power Query is 0-based, which means it counts the first data-point as 0th entry.
4 – Formatting
It’s time to format it. Follow the steps given below:
- Click on the header of the column, i.e. “List”, and then click on “To Table” under the Transform tab. Now press ‘OK’.
- Right-click on the column header again, which will read “Column1” now, and select ‘Rename…’. Type “Date” and press ENTER.
- Now right-click again, select ‘Change Type’ and then select ‘Data’. This will automatically convert their form to something we recognise as well.

5 – Additional Information
Let’s add a few more properties to our calendar which relate to dates. Left-click on the header, which now reads “Date”. Now go to Add Column tab, click on “Date”, select ‘Year’ and then click on ‘Start of Year’. We will see that it add a new column to our table with the start date of the year.
We can add many things like this: end of year, day number, month number etc. If we want to add a column showing the months but in “MMM” format, then we can do the following:
- Click on “Add Custom Column” in the Add Column tab.
- Give the column any name.
- Now type ToText([Date],”MMM”) as the formula. And press OK.
This should add a column with the month of the corresponding date written in the specified format. Remember “ddd” represents the first three letters of the day, “dd” represents the day number, “yyyy” represents the year and “MMMM” represents the month name in full. We can, of course, use a combination of these to come up with a custom format.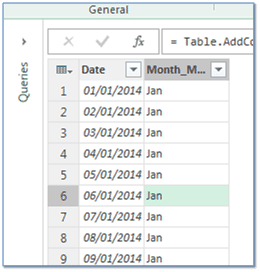
6 – Loading in Excel
From Home tab, select “Close & Load” arrowhead. Now select ‘Close & Load To…’. This will give us two options: to keep the calendar as a connection or to have it as a table in our workbook. The latter will help us start pulling data against it to run analysis afterwards. And that’s it, we are done.
This table should automatically update each day, as our end date will update. And if there is some error that’s preventing this from happening, we can always update it ourselves. Such select the table, and from Query tab, select “Refresh”.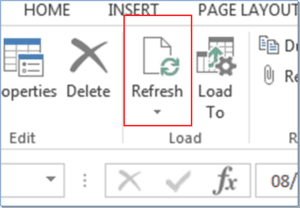
What’s next?
Next time you’re stuck trying to draw up a calendar, remember that there is a fix at your very own ExcelTV!
And do not forget to share this amazing tip with your fellow data analysts and Excel enthusiasts.
- SSSVEDA DAY 7 – Every Team Needs Someone Who Understands Data - February 18, 2018
- SSSVEDA DAY 5 – When Data Analysis is Wrong - October 31, 2017
- SSSVEDA DAY 4 – Sharing the Excel Knowledge - July 18, 2017

I would love to learn more from the videos you publish such as this one, but when the presenter is showing his or her full screen, and then it’s reduced because of the images of the other hosts at the bottom, it is virtually impossible to see what is being presented.
Thanks Mike. I will try to remedy this in future episodes when screens are being shared.