
Do you know that Excel allows us to zoom to a specified area in your work sheet? Yes, you heard it right. Suppose, you have an Excel sheet and while doing demo or so, you want to zoom to specified area, it can be done easily. Our very own Excel MVP Jordan Goldmeier lets us know how to auto resize an Excel spreadsheet with VBA and that too with just a single click.
So, without wasting any more time, let us jump in to the implementation!
Steps to Auto Resize an Excel Spreadsheet
To know auto resizing an Excel spreadsheet, there are four steps to be followed as,
- Select the area which you want to Zoom and give it a name
- Add a Button in Excel
- Create a Macro (VBA Code. Don’t Panic. I will let you know the code J)
- Assign Macro to the Button.
That’s it! These 4 steps as explained by Excel MVP Jordan Goldmeier lets you auto resize an Excel spreadsheet. Let us look in to these steps in detail.
1 – Select the area and give it a name
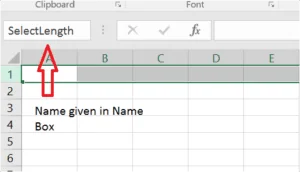
First step is to select the area which you want to zoom or auto resize and give it a name using Name Box.
- Select the area, head over to Name Box and enter the name.
- Selected the row 1 and gave it a name “SelectLength” in Name Box.
2 – Add a Button in Excel
- To add button to Excel, first add the Developer tab.
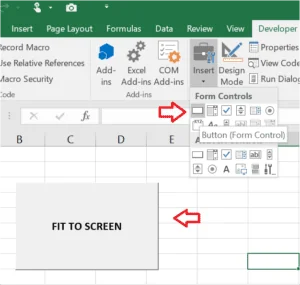
- Click “Developer” tab and click “Insert” and select button (first option) from the form elements.
- Click on the button and give the caption as “FIT TO SCREEN”
3 – Create a Macro
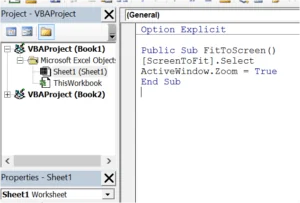
- Click “Developer” tab and click “Visual Basic” option.
Copy and Paste the below VBA Code in Microsoft Visual Basic for Applications editor,
Option Explicit
Public Sub FitToScreen()
[ScreenToFit].Select
ActiveWindow.Zoom = True
End Sub
 Jordan explained the each and every line of the code in the video very clearly. He also mentioned another code in the video, but that seems to be crashing some of the Excel sheets (but can be used).
4 – Assign Macro to Button
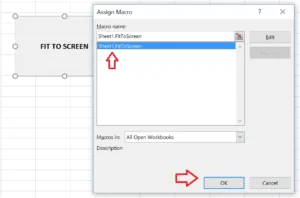
Now we need to assign the created Macro to the button
- To do so, right click on the button “FIT TO SCREEN” and click “Assign Macro”.
- Assign Macro dialog box opens up and click on the Macro you have just created.
- Now, click “Ok”. By doing so, created macro has been assigned to the button.
What are you looking for? We are done with the steps which we are supposed to do. Now, click on the button and you would see that, selected area has been zoomed.
By, following all these steps one by one, you are able to auto resize an Excel Spreadsheet with just a small VBA code simply!
What’s next?
Wow! It is very interesting. Is not it? Then what are you waiting for? If you have anything to add, please do share with us through comments.
