In a previous tip, I had complained about form control option buttons. I had argued they suffer because you can’t change the font size nor the “punch circle.” But then an idea dawned on me that builds off of that previous tip. We could use the same dynamic described in that earlier article and combine it with the camera tool.
Click here to learn more about the Camera tool.
Say Cheese!
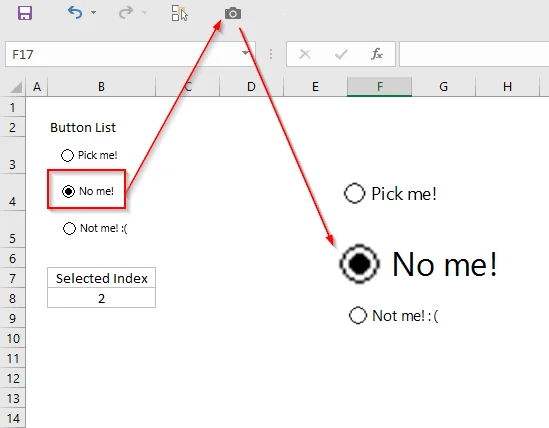
Let’s take a look. On the left side, I’ve create a button list. This is just a place to store my option buttons. Notice I’ve placed them within a single cell each—this makes it easy to take a snapshot with the camera tool (since the camera will always only reference one cell). The image below shows how this works. Notice option buttons are all linked to cell B8, which I’ve named “SelectedIndex.”

Again, following my previous tip, we can assign each image created by the camera tool to a macro. That macro would change the Selected Index depending upon which button was selected.
Let’s take a look at that macro:
Public Sub OptionButtonHandler() Dim Index As Integer Index = CInt(Replace(Application.Caller, "Button", "")) [SelectedIndex].Value = Index [SelectedIndex].Calculate End Sub
You maybe wondering about that last line in the subroutine. Camera tool images can be a little funky. In the previous screenshot, you can see that these option buttons images are on the same tab as their form control counterparts. Presumably, you’ll place the option button images on a different worksheet tab and the original button list will live on a hidden tab. For whatever reason, whenever you place these form control images on another tab, the image won’t always sync with the right value. So making a call to recalculate will ensure that it does. The download file provided at the end of this post demonstrates a setup where the images are on a different tab.
Note: I’ve only noticed this problem in Excel 2010. Excel 2013+ does not seem to have this issue requiring a call to calculate. I’ve included it here so it’s backward compatible with previous versions of Excel. It’s also a bit slower, so feel free to remove it completely if it’s not an issue on your end.
Discussion
Look, I’m probably not going to use these buttons anytime soon. I’m not saying you shouldn’t, but I don’t have a lot of use for them. I’ll still prefer my method of using shapes. However, the camera tool when combined with my earlier tip does allow you to create functionality not native to Excel. For instance, if you type a new font in one of the cells on the button list, you can even change the format of the radio button in the way it’s presented. In the image below, I’ve deleted the original caption to the option button. In its place I wrote another caption into the cell and picked a cheesy font. Yes, it doesn’t look great, but you can play with the formats and make it look better. This should give you an idea of what’s available.

My hope with this article is that we keep the creative juices flowing and see what other novel ways it can be applied. Again, I probably won’t use this, but hey, maybe you will, and that’s enough for me.
I’m going to Dublin, Ireland

From December 23-30, I’ll be in Dublin, Ireland on holiday with my wife. If you are in the Dublin area and would like to say hi, let me know! Otherwise, this is likely my last blog post before the end of the year, so have happy holiday and terrific new year!
Download file: Large Option Buttons.xlsm
Also, buy my new book! Makes a great stocking stuffer!
