
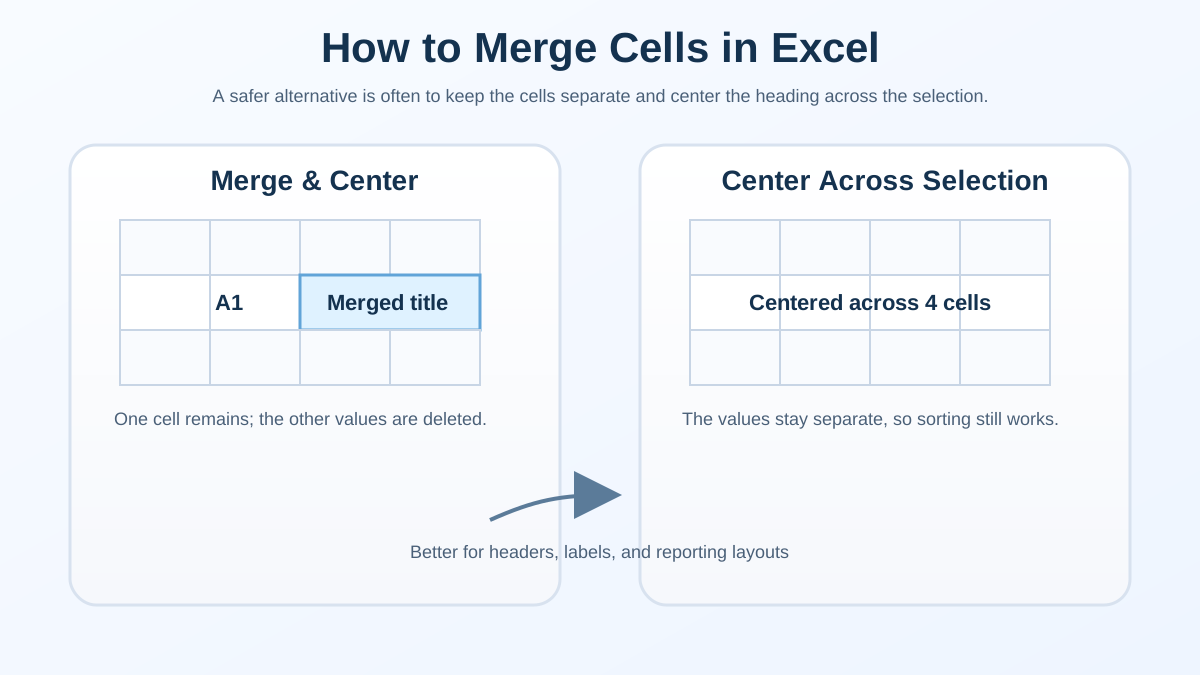
To merge cells in Excel, select adjacent cells and choose Merge & Center from the Home tab. That is useful for a static report title, but it is a poor default for working data. If you only want a heading to look centered, Center Across Selection gives you the same effect while keeping the grid intact.
That distinction saves cleanup later. A title above a printed report can be one merged block; a table of Month, Department, Amount, and Status should keep every row and column independent so filters, formulas, and new data keep working. Think of a merge as a layout choice, not a way to organize information.
| Method | Best for |
|---|---|
| Merge & Center | Static headers, print layouts, labels |
| Merge Across | Row-by-row labels in formatted tables |
| Merge Cells | Simple presentation layouts |
| Center Across Selection | Data tables that still need to work like data |
A useful scale check: Microsoft says an Excel worksheet supports 1,048,576 rows and 16,384 columns. In a grid that large, a formatting choice that preserves independent cells is usually easier to maintain than one that changes the structure. Microsoft Excel specifications and limits (accessed July 22, 2026).
How to merge cells in Excel
Merging cells in Excel takes only a few clicks: select an adjacent range, open the Merge & Center menu on the Home tab, and choose the merge style you need. Before you confirm it, make sure the upper-left cell is the only value you need to keep, because the other values will not survive.
Use the Merge & Center button on the Home tab
- Select the cells you want to combine.
- Go to the Home tab.
- Click the Merge & Center dropdown in the Alignment group.
- Choose Merge & Center, Merge Across, or Merge Cells.
Merge & Center combines the cells and centers the text in one step. It works well for a title like B1:E1 on a worksheet cover page that will never be sorted. Microsoft documents the same command sequence in its merge and unmerge cells guide.
Excel labels the command Merge & Center; people also search for it as merge and center. The operation is the same: it makes one larger cell, so use it only when the selected range contains a single value that can safely become a static label.
Use the Format Cells dialog for more control
- Select the cells.
- Press Ctrl + 1 on Windows or Cmd + 1 on Mac.
- Open the Alignment tab.
- Check Merge cells.
- Click OK.
I use this route when I am already adjusting wrap text or indentation on a dashboard cover sheet.
Keyboard shortcut for Merge & Center
The Excel shortcut is Alt, H, M, C on Windows. Press the keys in sequence, not all at once. The same dropdown also exposes Merge Across for row-based layouts and Merge Cells when you want the structural change without auto-centering.
What actually changes when you merge cells
Merging does more than center text: Excel turns several cells into one larger cell, keeps the upper-left value, and discards the rest of the selected values. That structural change is why formulas can become awkward and why sorting or filtering a nearby range can stop behaving as expected. It is not merely a visual format.
When you merge cells, Excel keeps only the upper-left cell’s content. For example, if B1:E1 contains a title plus helper text in the other three cells, only the B1 value remains after the merge. The result can look harmless, which is why it catches people out: the lost values are not simply hidden for later use.
That is why merged cells are risky in any worksheet that behaves like a database. If the range contains a name, date, amount, and note, merging the block will not preserve all 4 fields. You lose the structure that makes the data usable. For a one-off heading, that is okay. For rows and columns that drive calculations, it is not.
Why Center Across Selection is often the better default
Center Across Selection creates the visual effect of a merged heading without joining the cells. The text appears centered across your selected range, while every cell remains independent for sorting, filtering, copying, and formulas. For report headers and reusable templates, that makes it the safer default because the worksheet still behaves like a normal grid.
Consider a quarterly report with headers spanning columns B through E. If you merge B1:E1 and later need to insert a column for “Comments,” the merge resizes awkwardly or breaks entirely. If you use Center Across Selection, the new column slides in without disrupting the header at all. The same advantage applies when someone else takes over your file: they can sort, pivot, or restructure the data without fighting formatting choices they did not make.
How to apply Center Across Selection
Scope note: these steps apply to the Excel desktop apps for Windows and Mac. Microsoft documents Center Across Selection in the desktop Format Cells dialog in its Analyze Data guidance, but Excel for the web does not currently expose that alignment option in its interface. If you need it, open the workbook in the desktop app; the web app can display a workbook that already has the formatting, but you should not promise readers that the web ribbon can apply it.
- Select the range you want to visually span.
- Open Format Cells with Ctrl + 1 or Cmd + 1.
- Go to the Alignment tab.
- Under Horizontal, choose Center Across Selection.
- Click OK.
The text looks centered, but the worksheet still sees separate cells. The header can appear polished while the table below it remains fully functional.
Where Center Across Selection shines
It works especially well for table headers that sit above multiple columns, section names inside a larger data range, and worksheet titles that need visual balance but not structural changes. Reports that may later be copied into pivots, charts, or filtered views also benefit from this approach.
This pairs neatly with other display techniques like wrap text when labels are long, or color coding when you want the eye to move through a sheet quickly.
How to unmerge cells safely
To unmerge cells, select the merged range, open Home > Merge & Center, and choose Unmerge Cells. The grid returns, but unmerging does not restore values that disappeared during the original merge. Check the range first, copy the value you need, and use a backup or Undo if the missing content matters.
Unmerge from the ribbon
- Select the merged cell or merged range.
- Go to Home > Merge & Center.
- Click Unmerge Cells.
If the merged area contained only a title, you are done. If it contained multiple pieces of information, stop and check whether you have a backup or an undo path before you split it apart.
A practical cleanup habit is to inspect the range before you unmerge it. If the original block held unique values in several cells, those values are gone unless you saved them elsewhere. That is why unmerging is safe for presentation headers and risky for data-heavy sheets.
Merge & Center vs Merge Across vs Merge Cells vs Center Across Selection
Excel’s four merge commands sound alike, but they solve different layout problems. Merge & Center, Merge Across, and Merge Cells all create true merged areas; Center Across Selection does not. Pick the option based on whether the range is a finished visual label or active data that still needs to sort, filter, and expand safely.
Merge & Center
Combines the selected cells into one cell and centers the content. Use it for titles or static labels where structural independence is not important.
Merge Across
Merges cells across each row separately. Handy for row-oriented layouts, but still a true merge, so the same structural cautions apply.
Merge Cells
Merges without automatically centering the content. Least flashy option, but still changes the worksheet structure in the same way as the other merge commands.
Center Across Selection
Only changes the look of the text. The cells remain separate, so the worksheet keeps behaving normally. This is the safest option for real spreadsheets.
When I build a report header like “Revenue by Region” across B1:E1, Center Across Selection gives me the same look and leaves B2:E20 normal, so the data underneath still sorts and filters properly.
Common problems with merged cells
Merged cells cause trouble in worksheets that need to be manipulated, shared, or reused. They interrupt the one-value-per-cell pattern expected by tables, filters, copy-and-paste workflows, and formulas. A decorative title-row merge is usually manageable, but the same merge inside active data can create errors that are harder to diagnose than the original layout problem.
Sorting and filtering stop behaving normally
When a merged cell spans multiple columns or rows, Excel no longer has a simple one-cell-per-position structure. Sort and filter operations can fail or give you a message that the data cannot be manipulated. A weekly sales table with merged month headers looks tidy, but the rows underneath no longer behave like an ordinary list.
Copying and pasting becomes inconsistent
Copying a merged range into another table often causes alignment problems. Pasted data may land in the wrong shape, and ranges that were easy to move before the merge can become harder to reuse. If you are building a summary sheet from department tabs, a merged title row is often the first thing that causes weird spacing when you paste into the next block.
Formulas can become awkward to build
Merged cells are legal, but they are rarely formula-friendly. References may be harder to read, row logic becomes less predictable, and helpers like fill-down or structured references often work better when the grid stays intact. A simple SUMIFS, XLOOKUP, or PivotTable source range is easier to trust when each piece of data stays in its own cell.
A quick real-world example
In an expense tracker, merge only the decorative title row and leave the records below it alone. A workbook with Category, Vendor, Date, and Amount needs clean columns so you can sort, filter, extend the table, or build a PivotTable later. A centered month label across the live data area makes those routine tasks needlessly fragile.
In that same tracker, Center Across Selection gives you the polished look you want without creating cleanup work later. You can insert a new column for Payment Method, add filters, or build a PivotTable without first undoing a bunch of formatting. That is the main trade-off: merges are visually neat today, but separate cells are easier to maintain tomorrow.
Best practices for cleaner spreadsheets
The cleanest spreadsheet practice is to keep one value per cell, use a true merge only for static presentation, and use alignment or styling for everything else. That approach makes a workbook easier for another person to read, edit, and reuse. It also protects the sheet from the small formatting decisions that become expensive cleanup jobs later.
Do this instead of merging by default
- Use Center Across Selection for headers.
- Use cell styles, borders, and fill colors to create visual groups.
- Keep one value per cell whenever possible.
- Add a separate title row instead of building a title into a data range.
- Leave room for future filters, pivots, and formulas.
When a true merge is still okay
A merge is fine when the sheet is effectively finished, when it will be printed rather than analyzed, or when you are creating a static section heading that will never need to behave like data. In those cases, the visual clean-up is worth the trade-off.
What to use instead of merging cells
In most workbooks, keep cells separate and choose an alternative that matches the design problem: use Wrap Text for long labels, borders or color for visual grouping, and Center Across Selection for a centered heading. These options preserve the data structure, so the workbook stays easier to sort, filter, export, and maintain as it changes.
Here is the decision rule: use Merge & Center for a simple, static title. Use Center Across Selection for report headers and templates. Use Wrap Text when the content is too long for one line. Use color or borders when you want categories or emphasis. Avoid merging when the sheet contains data that will be sorted, filtered, or exported.
If you need a workbook that other people can maintain, structure beats decoration. A cell grid that stays editable is more valuable than one that looks slightly cleaner today but causes problems tomorrow. If you have to choose between a prettier sheet and a more reliable sheet, pick reliability.
For teams, I like one more rule: if a merge would force someone to ask “why can’t I click that cell?”, it probably does not belong in the working area. That tiny test catches a lot of unnecessary formatting before it turns into cleanup later.
Quick answer
To merge cells in Excel, select the range and use Merge & Center only when it is a static heading with one value to keep. For a working report, choose Center Across Selection instead: it delivers the centered look without changing the grid. That one decision keeps sorting, filtering, formulas, and future edits much less painful.
FAQ
For most workbooks, the safest answer is to merge only a static title that contains one value. Use Center Across Selection when you want the same centered appearance without combining cells. The answers below explain data loss, the difference between the two methods, table restrictions, and when merges become risky.
How do I merge cells in Excel without losing data?
You cannot preserve every value in a true merge. If you merge a range with different content, Excel keeps only the top-left value and discards the rest. If you need the visual effect only, use Center Across Selection instead.
What is the difference between Merge & Center and Center Across Selection?
Merge & Center combines cells into one cell and centers the text inside it. Center Across Selection keeps the cells separate and only centers the label visually across the selected range, so sorting and filtering stay safer.
Can I merge cells inside an Excel table?
No. Excel tables depend on a clean one-cell-per-value structure, so merged cells break the logic. If you need a grouped heading above the table, keep the table intact and center the text across the selection instead.
When should I avoid merging cells?
Avoid merging when the sheet will be sorted, filtered, exported, or used as a formula source. A merged area can hide values and make future edits harder, so structure is usually better than decoration.