We all know that for some problems, Protect Sheet tool under the REVIEW tab doesn’t cut it. Well, Jordan has found another way to restrict end-user access and it has its own advantages.
Let’s get to it.
1 – The Basics – Restricting Users
The way this technique works is by restricting users to a specific range within a sheet by limiting ‘Scroll Area’. For example, follow these steps:
- Make sure DEVELOPER tab is enabled.
- Go under this tab and click on Properties from the Controls section.
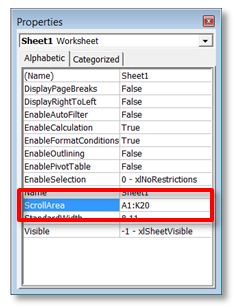
- Now type in the array you want to restrict users to in the ‘ScrollArea’ section and press Enter.
For illustration, we will be locking in “A1:K20” (see the image below). Now users cannot scroll down, neither can they click on any cell outside this range. Note that any contiguous range can be selected instead of “A1:K20”.
Benefits include getting rid of the need to unlock cells and enable sheet protection. Also, some features that are disabled by sheet protection would available here. The only problem is that the lock on scroll area disappears when you reopen the file. But we have a solution to this problem as well.
2 – Making it Stick Using VBA
Click on DEVELOPER > Visual Basic and then paste the following code in “ThisWorkbook”:
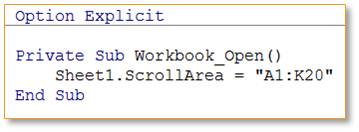
Note that “A1:K20” is just an example array. You can type in any other array as long as it is contiguous.
For people unfamiliar with event-driven programming in VBA: when you open a workbook, Excel calls it by event name “Workbook_Open”. And whatever code is written under this event name gets executed without the user asking for it. Hence, upon opening your Excel file, Sheet1 will always get a scroll lock on “A1:K20”. Other such events include “Worksheet_Activate”, “Worksheet_Deactivate” and “Workbook_Deactivate”.
3 – When To Use This Technique
This technique of restricting user access is useful in the following cases:
- To keep the users in one area of the screen.
- To design simple interfaces with contiguous array of cells.
- To protect specific columns of an input table.
The last case can also be dealt with through the use of ‘One Click UserForm’, a popular product to enable safe data entry.
4 – Problems That You May Have
The only problem now is that if your array is discontinuous, you cannot use this method. Of course, you can always resort to the classical sheet protection method in this case.
What’s next?
Start tapping away at your keyboard and try this technique out ASAP! I am sure you can put it to some amazing use in your own work.
Do not forget to share this cool trick with your colleagues. And write your thoughts to us in the comments section below.
- SSSVEDA DAY 7 – Every Team Needs Someone Who Understands Data - February 18, 2018
- SSSVEDA DAY 5 – When Data Analysis is Wrong - October 31, 2017
- SSSVEDA DAY 4 – Sharing the Excel Knowledge - July 18, 2017
