
To remove blank rows in Excel safely, decide whether a row is truly empty or merely has a blank in one column. Filter a required column and delete visible blank rows. For repeatable imports, use Power Query; for a non-destructive view, use FILTER.
The same distinction matters whether you want to delete empty rows, remove blanks from a report, or delete blank cells in one field: deleting a worksheet row affects the entire record, while clearing selected cells does not.
Source note: Microsoft documents filtering data in a range or table and its Find/Replace tools. Those commands are useful here because filtering lets you isolate records by a required field, while Find can reveal cells that only look blank because they contain spaces or other characters. Filter data in Excel · Find or replace text and numbers
Quick answer: choose the method that matches your data
Excel supports 1,048,576 rows per worksheet, so the safest cleanup method matters (Microsoft Support). Use a required-column filter by default; reserve Go To Special for wholly empty rows, Power Query for recurring imports, FILTER for a clean view, and VBA for an explicit repeatable rule.
Check what “blank” means before you delete anything
A single Excel cell can hold 32,767 characters, even though its row may look empty (Microsoft Support). Formulas returning "", pasted spaces, and notes outside visible columns all matter. Define a required field and remove a row only when your business rule says the record is invalid.
Make a copy of the sheet or save the workbook before a large cleanup. In a table with optional fields, checking a single optional column can make valid records look disposable. Press Ctrl+Z immediately if a method selects more rows than you expected.
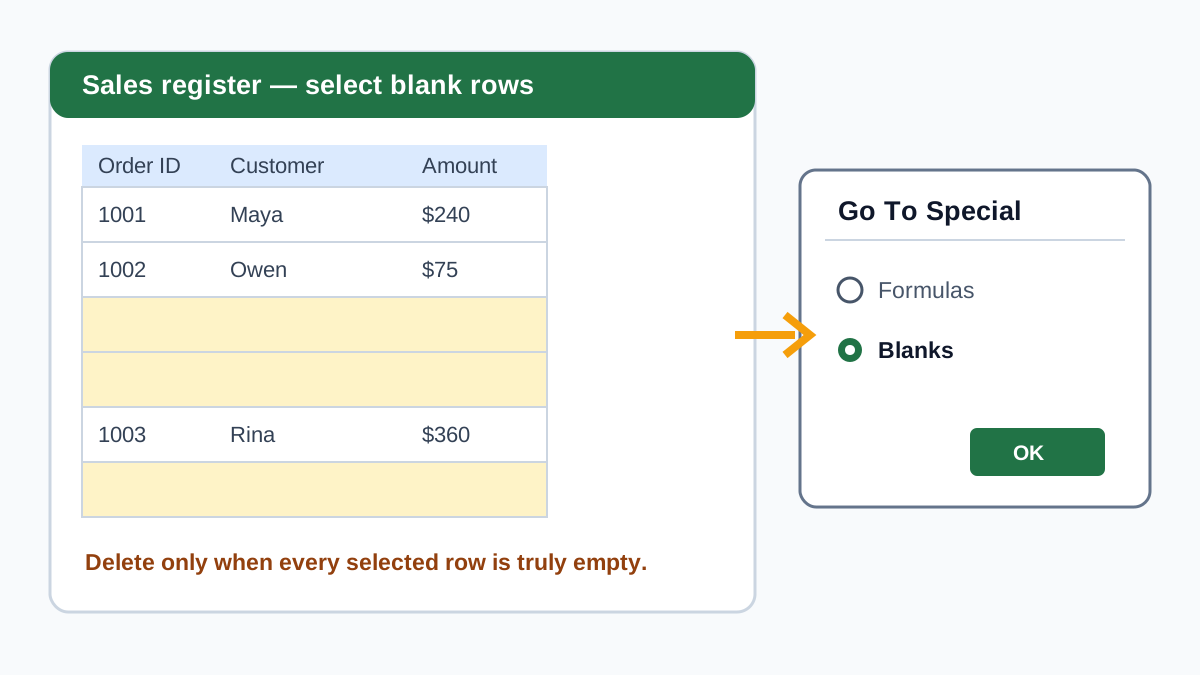
Method 1: delete entirely empty rows with Go To Special
Excel can select up to 2,147,483,648 noncontiguous cells, which shows why a broad selection deserves inspection before deletion (Microsoft Support). Go To Special selects blank cells, not semantically blank records. Use it only when every column in each targeted row is empty; optional fields make this method risky.
- Select the data range, excluding a title or totals area.
- Press
Ctrl+G(orF5), choose Special, then choose Blanks. - Check that the selected cells form whole empty rows rather than scattered blanks.
- On the Home tab, choose Delete > Delete Sheet Rows.
If Excel highlights one blank cell inside many otherwise populated rows, cancel and use Method 2 instead. Deleting sheet rows from that selection would remove each entire record, not just the selected blank cell.
Method 2: filter a required column, then delete visible blank rows
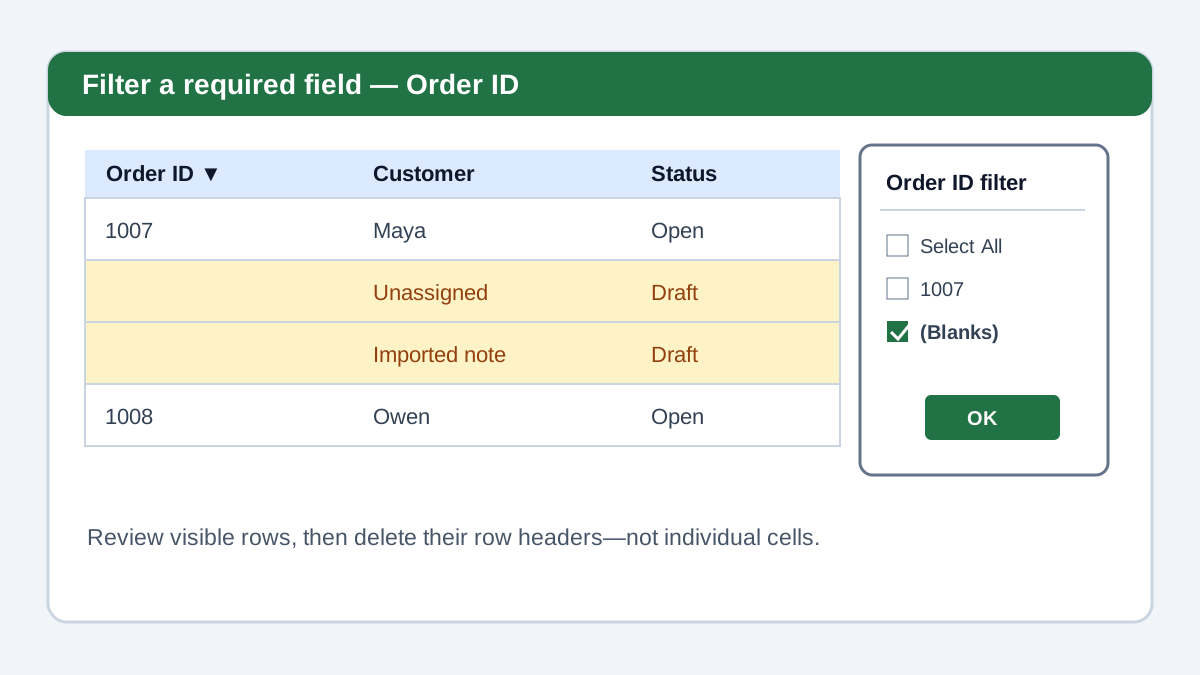
An Excel filter menu displays up to 10,000 items, according to Microsoft’s worksheet limits (Microsoft Support). Filtering a required column is still the safest general method because you define what makes a record valid. Excel hides populated records so you can inspect and delete only gaps that meet that rule.
- Click any cell in the range or table, then turn on Data > Filter if needed.
- Open the filter arrow for a column that every real record must contain.
- Clear Select All, select (Blanks), and click OK.
- Select the visible row numbers, right-click, and choose Delete Row or Delete Table Rows.
- Clear the filter and confirm that the remaining records stay aligned.
Filtering is also a useful safety check: rows with a formula that displays nothing may appear differently from cells that contain no value. Inspect the visible rows before you delete them.
Method 3: sort one key column to group blank rows for review
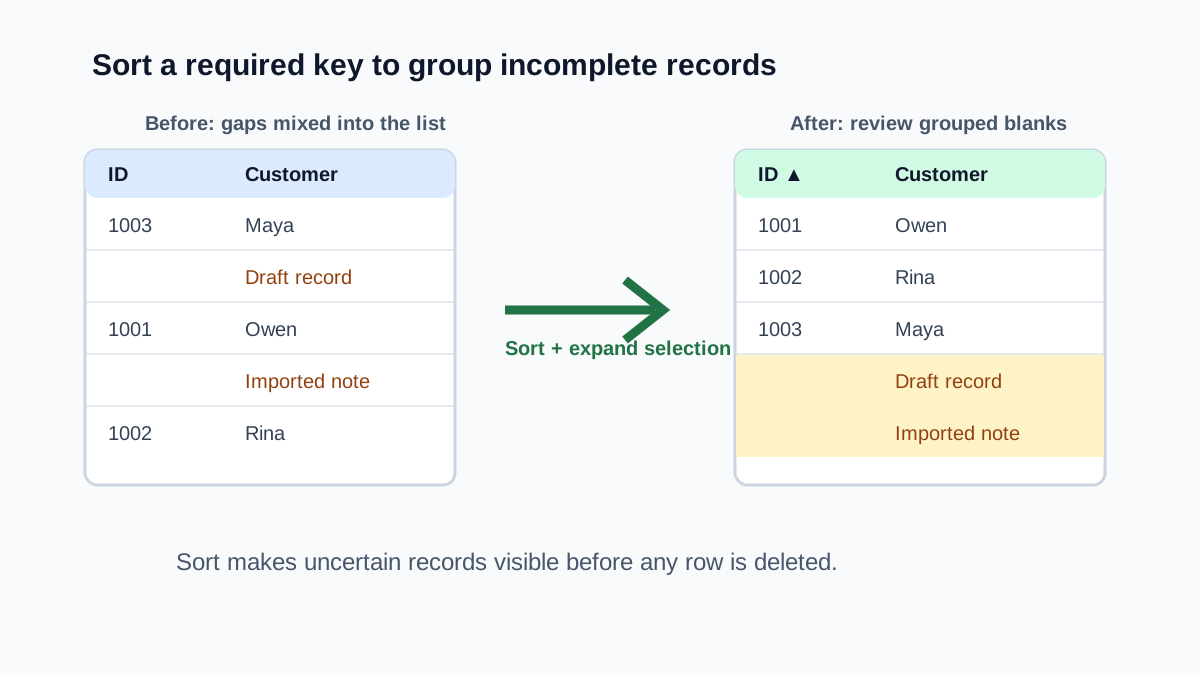
Excel supports up to 64 sort references in one sort, but none records an arbitrary prior order for you (Microsoft Support). Before sorting, add a temporary Original Order column numbered 1, 2, 3, and so on. That key is the reliable way to restore the sheet after reviewing grouped blanks.
- Add a temporary Original Order column and fill it with sequential numbers.
- Select a cell in the data range and choose Data > Sort.
- Choose a required key, such as Record ID, and sort A to Z or oldest to newest.
- When prompted, choose Expand the selection so columns do not become misaligned.
- Review the grouped blanks at one end of the list and delete their row numbers.
- Sort the Original Order column smallest to largest, then remove that helper column.
Without an Original Order key, a later sort cannot reliably reconstruct an arbitrary manual sequence. This method preserves the chance to spot a record that lacks an ID but still has a name, amount, or comment. It is slower than filtering, but better when the definition of “blank” needs human review.
Method 4: remove blank rows in Power Query for recurring imports
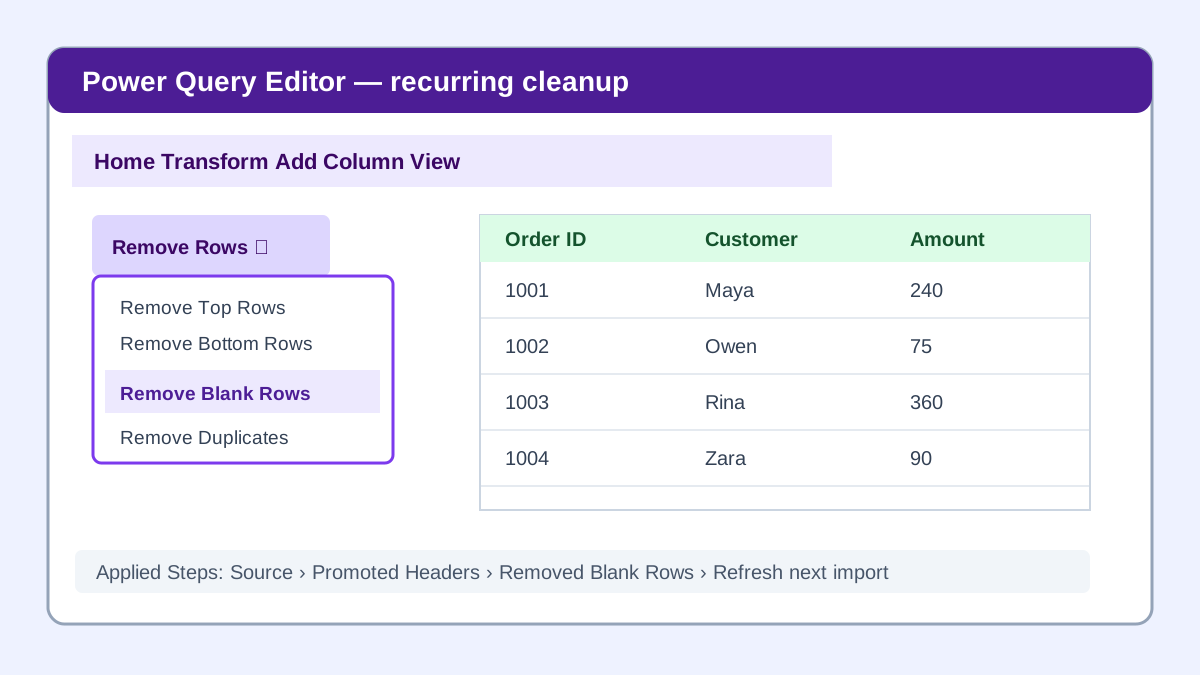
Excel’s grid allows 1,048,576 rows, while Power Query records each cleanup as an applied step (Microsoft Support). Use it for weekly or monthly imports: remove fully blank records in the query, preserve the source, and review the transformation before loading the result.
- Select the source range and choose Data > From Table/Range.
- In Power Query Editor, select the columns that define a usable record if needed.
- Choose Home > Remove Rows > Remove Blank Rows.
- Review the preview, then choose Home > Close & Load.
- Refresh the query next time you receive the source file.
If a row contains a space or a formula result, Power Query may not consider it blank. Clean or replace those values first, and keep the applied steps visible so another person can understand what the query removes.
Method 5: create a clean list with FILTER without deleting source rows
Dynamic-array formulas have spilled automatically since Microsoft’s September 2018 update, but spilled arrays are not supported inside Excel tables (Microsoft Support). Put FILTER in the worksheet grid outside a table, use a required column as its test, and keep the imported source unchanged.
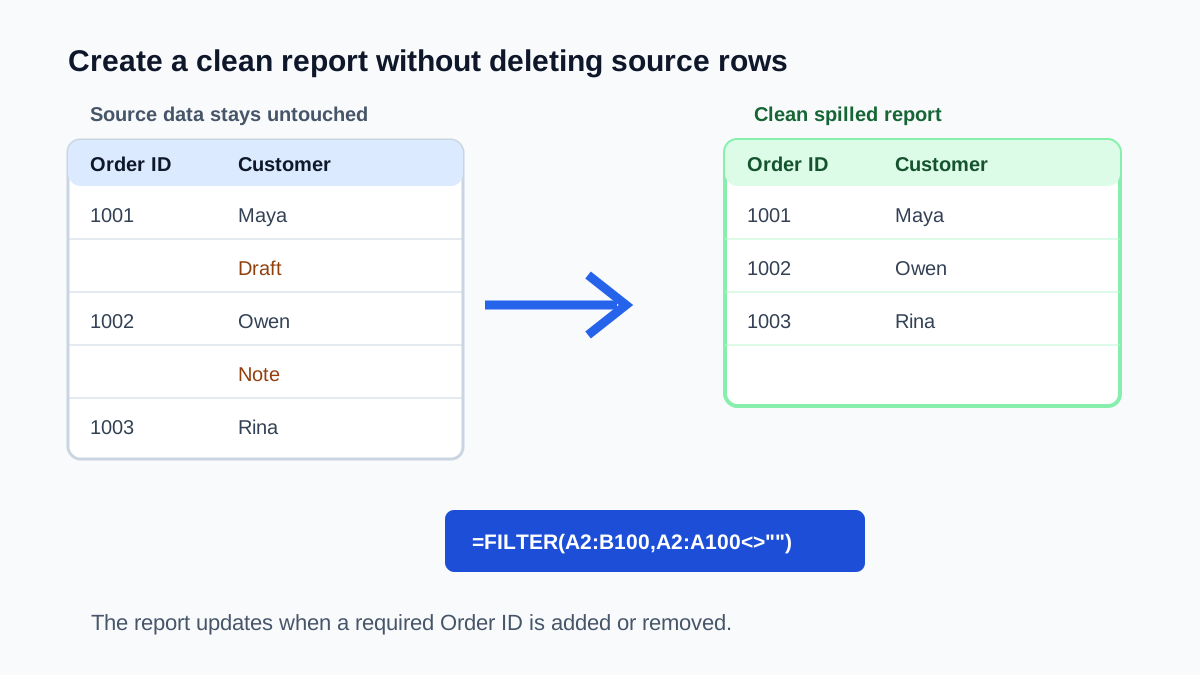
- Choose an empty cell where the clean list can expand.
- Enter a formula such as
=FILTER(A2:D100,A2:A100<>"","No records"). - Replace
A2:A100in the test with your required key column. - Check the spilled results and apply normal range formatting; do not convert the spill area to an Excel table.
- Keep the original range as the source of truth; the clean list updates as source data changes.
This approach requires a version of Excel that supports dynamic arrays. The source may be an Excel table and structured references can expand with it, but the FILTER formula and its spill range must remain in the grid outside that table.
Method 6: use VBA only when the cleanup rule is explicit
Excel permits 64 nested function levels, but VBA bypasses worksheet-formula complexity and can delete many rows at once (Microsoft Support). Use it only with an explicit rule. The macro below checks all 4 columns from A through D and leaves any row containing a value, formula, or note.
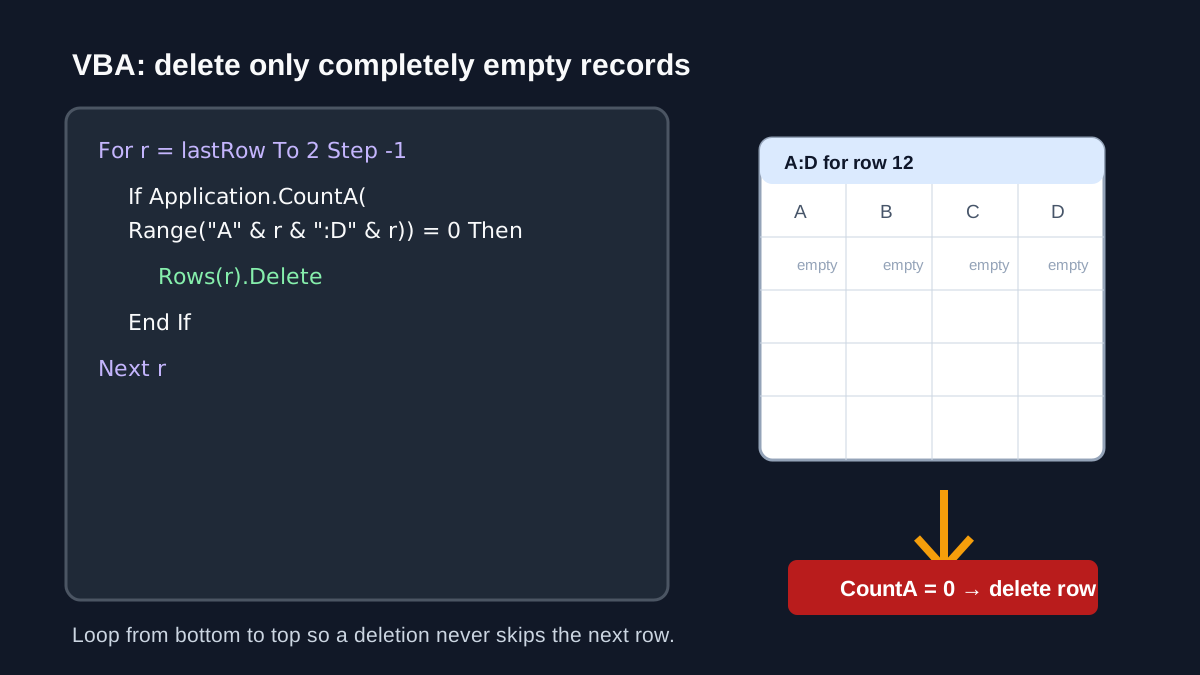
- Save a copy of the workbook as a macro-enabled file if you need to keep the code.
- Press
Alt+F11, choose Insert > Module, and paste the macro. - Change
A:Dto the columns that define an entirely empty record. - Run it on a copy first and compare the before-and-after row count.
- Keep the macro only if the cleanup will be repeated and reviewed.
Sub DeleteCompletelyEmptyRows()
    Dim ws As Worksheet
    Dim checkedColumns As Range
    Dim lastCell As Range
    Dim annotationCell As Range
    Dim legacyNote As Comment
    Dim threadedComment As CommentThreaded
    Dim rowsWithAnnotations As Object
    Dim lastRow As Long
    Dim r As Long

    Set ws = ThisWorkbook.Worksheets("Data")
    Set checkedColumns = ws.Range("A:D")
    Set rowsWithAnnotations = CreateObject("Scripting.Dictionary")

    Set lastCell = checkedColumns.Find( _
        What:="*", _
        After:=ws.Range("A1"), _
        LookIn:=xlFormulas, _
        LookAt:=xlPart, _
        SearchOrder:=xlByRows, _
        SearchDirection:=xlPrevious, _
        MatchCase:=False, _
        SearchFormat:=False)

    If Not lastCell Is Nothing Then lastRow = lastCell.Row

    ' Legacy Notes are Comment objects in VBA.
    For Each legacyNote In ws.Comments
        Set annotationCell = legacyNote.Parent
        If Not Application.Intersect(annotationCell, checkedColumns) Is Nothing Then
            rowsWithAnnotations(CStr(annotationCell.Row)) = True
            If annotationCell.Row > lastRow Then lastRow = annotationCell.Row
        End If
    Next legacyNote

    ' Modern comments are CommentThreaded objects.
    For Each threadedComment In ws.CommentsThreaded
        Set annotationCell = threadedComment.Parent
        If Not Application.Intersect(annotationCell, checkedColumns) Is Nothing Then
            rowsWithAnnotations(CStr(annotationCell.Row)) = True
            If annotationCell.Row > lastRow Then lastRow = annotationCell.Row
        End If
    Next threadedComment

    If lastRow < 2 Then Exit Sub

    For r = lastRow To 2 Step -1
        If Application.CountA(ws.Range("A" & r & ":D" & r)) = 0 _
            And Not rowsWithAnnotations.Exists(CStr(r)) Then
            ws.Rows(r).EntireRow.Delete
        End If
    Next r
End Sub
Replace "Data" with the exact worksheet name. The qualified ws.Range and ws.Rows references prevent another active sheet from being changed. Find locates the last value or formula across A:D; the annotation loops preserve legacy Notes and threaded Comments, extending lastRow for a trailing annotation. Microsoft documents those objects through Worksheet.Comments and Worksheet.CommentsThreaded.
Before trusting the macro, test these cases on a copy:
- An entirely empty interior row in A:D is deleted.
- An otherwise empty interior row with a legacy Note in A is kept.
- An otherwise empty trailing row with a threaded Comment in D is found and kept.
The annotation dictionary is the separate deletion guard that COUNTA cannot provide. The bottom-up loop still avoids skipping rows after a deletion.
Which blank-row method should you use?
Excel keeps up to 100 undo levels, but closing a workbook or running some automated operations can make recovery less straightforward (Microsoft Support). Choose the least destructive method: filters for mixed lists, Go To Special for wholly empty rows, Power Query for repeat imports, and FILTER when preserving source data matters.
| Situation | Best method | Why |
|---|---|---|
| A one-off table with a required ID | Filter | Lets you inspect only missing-ID records |
| Truly empty spacer rows in a simple range | Go To Special | Fast when every selected row is empty |
| Uncertain or partly completed records | Sort | Groups blanks for a human check |
| A weekly or monthly CSV import | Power Query | Repeats the recorded cleanup on refresh |
| A dashboard that must retain raw data | FILTER | Creates a non-destructive clean view |
| A governed repeated workflow | VBA | Applies a documented rule consistently |
Prevent blank rows from returning to your workbook
Excel supports 65,490 unique cell formats and styles, yet visual formatting should not substitute for a sound record structure (Microsoft Support). Keep one record per row, avoid blank spacer rows inside tables, and use a dedicated Notes column. A structured table expands more predictably than an improvised range.
For shared files, add data validation to required fields and document which column identifies a completed record. If data arrives from another system, make Power Query cleanup part of the import rather than asking every editor to repeat manual deletion.
Troubleshoot rows that look blank but will not disappear
Because a cell can contain 32,767 characters, appearance alone is not evidence that it is empty (Microsoft Support). Spaces, nonbreaking spaces, and formulas returning "" can all create blank-looking cells. Check the formula bar, use Find where appropriate, and inspect the required key column before you delete anything.
You can also test a suspect cell with =LEN(A2); a result above zero means the cell contains characters, even if it looks empty. For a formula-driven blank, decide whether it should remain a valid record before converting it to a true empty cell.
Common mistakes when deleting blank rows
The biggest mistake is deleting entire worksheet rows after selecting blanks in only one optional column. Another is sorting one column without expanding the selection, which separates values from their matching records. Deleting visible filter results is safe only when you select the row headers, not a handful of individual cells.
Avoid treating a “blank” as a universal rule. A blank ship date may be meaningful for an open order, while a blank order ID may indicate junk data. Define the rule in the context of the sheet, save a backup, and verify totals, formulas, and row counts afterward.
Frequently asked questions
Microsoft’s limit of 100 undo levels is useful, but it is not a substitute for a backup and a defined deletion rule (Microsoft Support). The answers below distinguish clearing cells from deleting rows, explain formula changes, and identify the fastest safe shortcut for genuinely empty records.
For the next cleanup step, use How to Remove Duplicates in Excel for repeated records, How to Replace Blank Cells with Zero in Excel for displayed empty values, or How to Use UNIQUE and Ignore Blanks for a formula-based clean list. Those jobs are distinct from deleting incomplete rows.
Can I remove blank rows from only one column?
You can clear blank cells or filter one column, but deleting a worksheet row affects every column in that record. If you only need to remove spaces within a single column, work on that column’s cells instead of deleting rows.
Why did deleting blank rows change my formulas?
Excel adjusts many relative references when rows are deleted. That is normally useful, but formulas that refer to fixed positions or external ranges deserve a quick check afterward. Make a copy before deleting rows in a model.
Is there a keyboard shortcut to remove blank rows?
There is no single universal shortcut that safely decides which blank rows to delete. Ctrl+G, Special, and Blanks is the fast route for an all-empty range; filtering a required column is safer for real-world data.
